How to Save a Power Point Slide as a Transparent Image
It doesn’t matter whether you are an app developer, web designer or graphic designer, there are some basic things in computer usage that you should know, which will help you a lot in your works. For example, one of the simplest things that you may need as a designer is to save a PowerPoint slide as a transparent image. One of the main benefits of transparent images is that you can use them anywhere. For example you can add them in other pictures or in your slides of presentation without that annoying background that they have. Another important advantage that is worth mentioning is that now it is trendy to use transparent images everywhere, for example in websites. So, today we are going to tell you the way of saving a PowerPoint slide as a transparent image.
1. First of all, you should open the PowerPoint slide that you want to save as a transparent image.

Photo credit: www.wallvafer.com
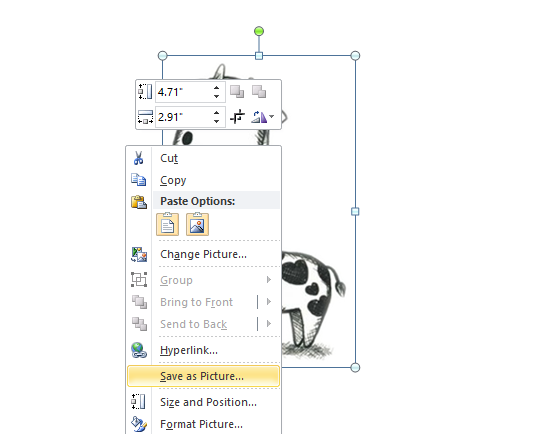
2. Then, you should drag the mouse around the part of your PowerPoint slide that you want to save with transparent background.

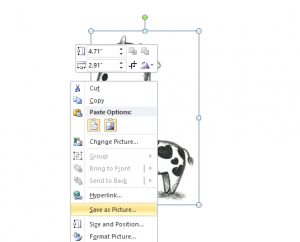
3. After this, you should right click the mouse and choose “Save as Picture” option.
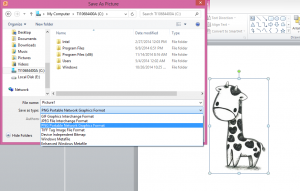
4. Now, you should choose the place where you want to save the image. In addition, make sure that as an image format you choose the “PNG Portable Networks Graphics Format”.
5. In addition, if you have other PowerPoint slides that you want to save with a transparent background, you need to save them one at a time. You should just go to the next slide you want to save and repeat the steps from 1 to 4.
So, now I am sure that you can save any PowerPoint slide that you want as a transparent image and use them in any project you want. I really hope that it will help you one day in one of your work projects.
Here’s another article you might like: How To Remove Background From An Image With Power Point

No Comments